
The water source determines the risk, and a prompt response helps limit further damage. Water damage is classified into three categories: Category 1 involves uncontaminated water, such as a supply-line leak or rainwater. Effective water damage recovery for homeowners starts with identifying the source, addressing immediate hazards, and removing moisture safely.
It’s understandable to focus first on wet floors, damaged belongings, and what insurance may cover. But acting quickly matters: according to the U.S. Environmental Protection Agency, mold can begin to develop within 24-48 hours after water exposure.
This guide explains how to recognize water damage, what to do first, how sudden and accidental damage may be covered by homeowners insurance, and how to clean belongings while reducing mold risk. You’ll also learn when professional restoration can help limit damage and move your home toward recovery.
Key Takeaways
- Identify the water source and contamination risk first; that shapes the safest cleanup approach.
- Document the damage and review your policy, since homeowners insurance may cover sudden and accidental water damage.
- Sort affected belongings by material and exposure, then clean and disinfect items appropriately.
- Remove moisture promptly and dry affected areas thoroughly to help limit mold growth.
- When water has spread into building materials or cleanup feels unsafe, professional restoration can help contain damage and guide recovery.
What is water damage?
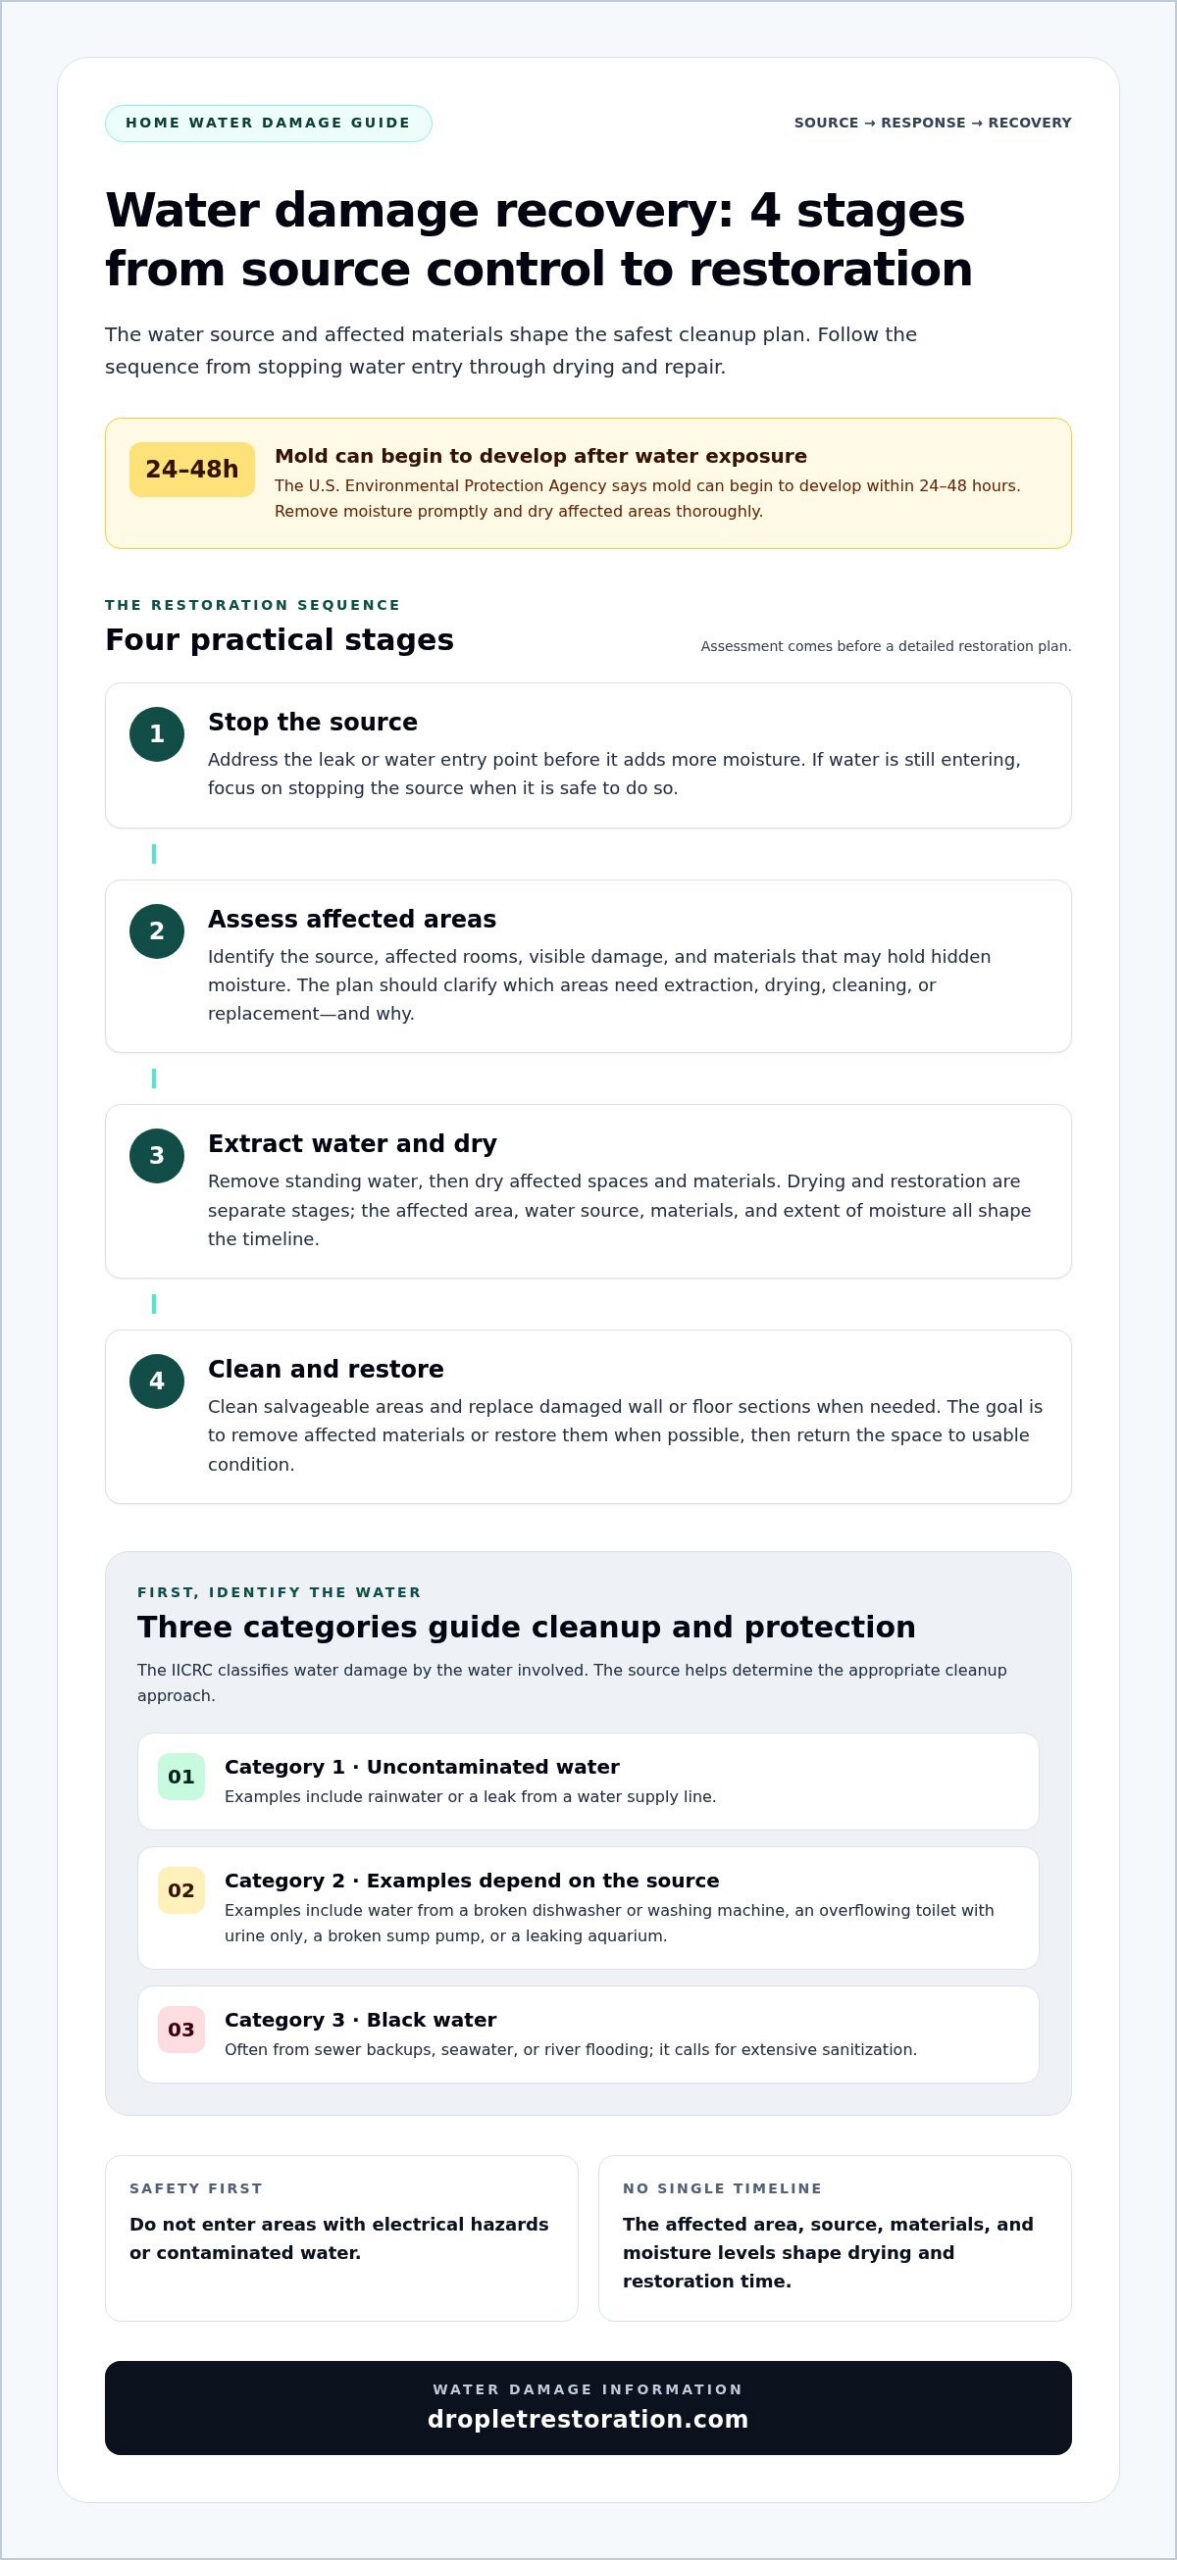
Water damage occurs when unwanted water affects a building’s materials, contents, or usable spaces. Common sources include a supply-line leak, rain entering through a roof, an overflowing appliance, or flooding. The IICRC classifies water damage into three categories based on the water involved. Identifying the source and category helps guide safe cleanup, water extraction, and restoration.
Category 1 involves uncontaminated water, such as rainwater or a leak from a water supply line. Category 2 can involve water from a broken dishwasher or washing machine, an overflowing toilet with urine only, a broken sump pump, or a leaking aquarium. Category 3 is black water, often from sewer backups, seawater, or river flooding, and calls for extensive sanitization. The category can affect what cleaning and protection steps are appropriate.
Residential and commercial restoration share a goal: remove affected materials or restore them when possible, then return the space to usable condition. At home, water may reach drywall, flooring, cabinets, or personal belongings. In a commercial building, it may also affect work areas, stored items, or equipment. Restoration can include water extraction, drying, cleaning, and replacing damaged sections of walls or floors.
Assessment comes before a detailed restoration plan. A professional identifies the water source, affected rooms, visible material damage, and areas that may hold hidden moisture. In Vancouver, Washington, a roof leak after rain and a failed appliance require different source-control steps. The plan should explain which areas need extraction, drying, cleaning, or material replacement, and why.
How long does water damage drying and restoration take? There’s no single timeline. The affected area, water source, materials, and extent of moisture all shape the work. Drying and restoration are separate stages, and repairs may follow after affected materials have been assessed and dried.
A professional water restoration process generally moves through practical stages:
- Stop the source. Address the leak or water entry point before it adds moisture.
- Assess affected areas. Map visible damage and check materials that may be wet beyond the surface.
- Extract and dry. Remove standing water, then dry affected spaces and materials.
- Clean and restore. Clean salvageable areas and replace damaged wall or floor sections when needed.
When choosing a water damage restoration company, focus on its work plan. Ask how the assessment will identify affected areas, how extraction and drying will be handled, and how the team will document damage and explain next steps. A clear process helps you understand how the work will protect your property and address both visible damage and moisture that may remain in materials.
Homeowners insurance coverage for sudden and accidental water damage
Many homeowners insurance policies help cover water damage when its cause is sudden and accidental, but coverage depends on the policy. Record what happened and what was affected as you review the policy terms.
Documenting Damage for Insurance
Build a clear record before moving or discarding damaged belongings, if it’s safe to do so. Photograph each affected room, close-ups of damaged materials, and the apparent water source. Note the date and briefly describe what you saw, such as water beneath a sink or a ceiling stain below a roof leak.
Keep the original images and notes together. A room-by-room record shows the extent of the damage and how it changes during cleanup. Add photos after extraction or drying if conditions change, and keep them separate from the first set so the sequence stays clear.
Preparing Insurance Claim Documents
Gather your policy information, damage photos, a timeline of events, and an inventory of affected belongings. For each item, note its location, condition, and any available proof of ownership. Keep receipts for emergency purchases or work to protect the property, and label each with its date and purpose.
Organize records by room or damage type instead of combining everything into one list. For example, document kitchen cabinet damage separately from wet hallway flooring. This makes it easier to describe what happened, what was affected, and what you did to limit further damage.
Claims Coordination and Assistance
Contact your insurer to report the incident and learn how to submit claim information. Keep a log of calls, dates, names, and instructions. If an adjuster or restoration professional reviews the property, note which areas they inspected and share your photos and timeline to support a consistent account.
Organized claims information can help keep damage records, restoration findings, and insurer communications together. Compare written estimates and explanations by affected area and proposed work. If a document uses unfamiliar terms, ask for a plain-language explanation before relying on it or deciding what to do next.
Coverage depends on the policy language and the cause of the water damage. A sudden pipe leak may be treated differently from damage linked to an ongoing condition, so describe the event accurately and don’t assume what the policy covers. Read the relevant sections, including applicable limits and exclusions, and keep a copy of the policy with your claim records.
Take practical steps without destroying evidence. If water is still entering, focus on stopping the source when safe. Photograph the condition first if doing so won’t delay an urgent response. Move undamaged belongings away from wet areas, and record anything moved or discarded. Don’t enter areas with electrical hazards or contaminated water. Keep invoices and notes for each mitigation action.
Insurance documentation is most useful when it connects the event, the affected areas, and the steps taken afterward. A consistent record can help you explain the loss and track the restoration work. For a coordinated record of property damage and restoration needs, water damage assessment information can be a practical next step.
Cleaning and disinfecting water-damaged belongings
Sort belongings by water exposure and material before cleanup. The source matters: Category 2 affected property must be disinfected, while Category 3 water requires extensive sanitization.
Cleaning and Sanitization
Separate items that contacted different water sources, and record their locations before moving them. Category 2 water can come from a broken dishwasher or washing machine, a leaking aquarium, or a toilet overflow involving urine only. Disinfect affected property after cleanup, and clean surfaces that water contacted.
Category 3 water, often associated with sewer, seawater, or river flooding, requires extensive sanitization. Don’t handle contaminated belongings as ordinary household laundry. Keep them apart from clean items, and avoid spreading residue to other rooms. For salvageable belongings, follow cleaning instructions suited to the item’s material.
DIY Water Cleanup
For a small, manageable amount of clean water, a wet/dry vacuum can remove standing water. A steam cleaner can be used on carpets during cleanup. First identify the source and assess whether the water may be contaminated. Don’t use household equipment for floodwater or water from an uncertain source.
Move dry belongings away from wet floors, then sort damp items by material. Wash and disinfect items after water cleanup if their care instructions allow it. Keep cleaned items separate from belongings still awaiting treatment. If the affected area is beyond what you can safely manage, stop DIY work and arrange a professional assessment.
Cleaning is only one part of recovery. Restoration may also involve extracting water, drying affected areas, and repairing or replacing damaged sections of walls and floors. For example, a wet ceiling may need assessment for hidden moisture before repairs begin. Don’t cover or repaint visibly damaged materials before addressing the underlying condition.
Follow a clear sequence: remove standing water, separate affected belongings, clean salvageable items, and assess materials that may need repair. Keep a simple inventory of each item’s material, water exposure, and cleaning status. This helps prevent untreated belongings from being mixed into clean rooms during restoration.
What permits or local rules apply to water damage repairs and mold remediation? Requirements depend on the work and local jurisdiction. Before structural repairs or mold remediation, check the applicable requirements with your local building department.
Floods can bring contaminated water and increase structural and electrical risks. Keep people away from affected areas if hazards are present, and don’t begin DIY extraction where electrical danger or contaminated water may be involved. Setting a clear boundary protects clean belongings and limits further spread while cleanup is planned.
Mold prevention after water damage
Dry affected areas promptly, then check floors, walls, and hidden spaces for lingering moisture. Preventing mold starts with reducing dampness and correcting the water source.
Preventing Further Property Damage
Stop water from entering before starting cleanup. If a pipe is leaking, shut off its water supply when safe. For roof damage, keep people away from areas where ceilings may sag. Avoid electrical equipment in wet spaces, and move dry belongings away from damp floors.
Next, arrange prompt water extraction and drying. Moisture trapped beneath flooring or behind walls can damage materials even after visible water disappears. Check adjoining rooms, closets, and lower levels for damp spots. Severe water damage can rot wood, so include wooden trim and framing in the assessment.
After recovery, inspect plumbing, roofs, and basements regularly. Keep gutters clear and direct downspouts away from the foundation to reduce pooling and seepage. Test the sump pump before the rainy season, and consider water sensors near leak-prone appliances or pipes. These steps can help you spot water sooner.
Mold Prevention Measures
Move quickly: according to the U.S. Environmental Protection Agency, mold can begin to develop within 24-48 hours after water exposure. Start drying as soon as the source is controlled. Extract standing water, open the affected area to airflow when safe, and remove wet materials that cannot be dried thoroughly.
Check beyond visible surfaces. Look beneath rugs, around baseboards, and inside cabinets near the leak. A dry floor beside a damp wall doesn’t prove the wall cavity is dry. Track affected areas during cleanup and revisit them as drying continues.
Don’t paint over water stains or cover damp materials to hide damage. Fix the source, dry the material, then assess what can be cleaned and what needs removal. If mold is visible or moisture remains inside building materials, professional restoration can help determine the next cleanup steps.
Home Humidity and Mold Prevention
Control indoor moisture after drying. The U.S. Environmental Protection Agency recommends keeping home humidity below 60% to reduce mold spread and support a comfortable living space. Use a humidity monitor to track indoor conditions, especially in rooms affected by leaks or flooding.
Ventilate moisture-prone areas, and address condensation on windows or pipes. If humidity remains elevated, find the source rather than relying on surface cleaning alone. Check for a continuing leak, damp materials, or poor airflow that may be keeping a room moist.
Keep a simple record of drying progress, humidity readings, and repairs. For example, note when a basement floor feels dry and whether the room’s humidity stays below 60%. Recheck affected areas after cleanup so lingering moisture doesn’t undermine mold prevention.
Water damage mitigation and prompt response
Mitigation starts with stopping the water source and limiting exposure. The first actions protect people, preserve belongings, and help prevent a manageable leak from causing larger problems. A focused response gives water damage recovery for homeowners a safer starting point.
Act in sequence. If a supply line is leaking, shut off its valve when safe. For a roof leak, place a container beneath drips and keep people clear of affected ceilings. Avoid standing water near electrical equipment. Floodwater can be highly contaminated and increase structural and electrical damage risks, so don’t treat it like a clean household leak.
Once immediate hazards are addressed, record the affected rooms and visible changes. Note where water entered, how far it spread, and which materials feel damp. A phone photo of a wet hallway floor or stained ceiling helps track conditions. Keep updating this record as mitigation and restoration progress.
- Stop the source. Close the relevant valve or contain roof drips when safe.
- Protect unaffected areas. Move dry belongings away from wet rooms and keep foot traffic limited.
- Remove standing water. A wet/dry vacuum can help with small amounts of manageable water.
- Arrange assessment. Identify wet materials, hidden moisture, and areas requiring extraction or drying.
DIY water cleanup has limits. A wet/dry vacuum may remove accessible water, but it can’t show whether moisture remains behind a wall or beneath flooring. Don’t use household equipment for contaminated floodwater or near electrical hazards. If water has reached multiple rooms, ceilings, or structural materials, a professional assessment can clarify the work needed.
Speed matters because neglected or improperly cleaned Category 1 or Category 2 water damage can become Category 3 damage. That change raises contamination concerns and may require more extensive sanitization. Keep affected items separate from clean belongings, and don’t return them to dry rooms before cleanup is complete.
Mitigation and mold remediation are related but address different stages. Mitigation limits ongoing damage through source control, extraction, and drying. Mold remediation addresses mold growth when present. If a musty odor or visible growth appears after a leak, include it in the assessment instead of covering or repainting the area.
When water has spread beyond a small, safe cleanup, request water damage mitigation to assess affected materials and plan the next steps. This organized response helps water damage recovery for homeowners move from urgent containment toward a clear restoration plan.
Homeowners can use a wet/dry vacuum to remove water and a steam cleaner on carpets when handling water damage themselves.
Droplet Restoration: Water Damage Restoration
Droplet Restoration provides Water Damage Restoration when leaks, flooding, or wet building materials need professional attention. Its certified IICRC technicians respond within 90 minutes to mitigate damage and begin recovery. The team can assess affected areas, remove water, and support the restoration process. Droplet Restoration also works directly with insurance providers to help streamline claims, keeping restoration documentation and insurer communication connected.
Turn to professional restoration when water has spread beyond a small, safe cleanup, reached building materials, or left moisture you can’t locate. Droplet Restoration provides water, fire, mold, and storm damage restoration.
Contact Droplet Restoration to discuss water damage restoration for your property.
Take the next step toward a safe, usable home
Recovery isn’t just about making visible damage disappear. It’s about making informed decisions before rooms, belongings, and repairs return to everyday use. Keep your records together, note areas that still feel damp, and include unresolved concerns in the restoration plan. That gives you a clearer basis for deciding what can return to normal and what needs more attention.
Droplet Restoration provides water damage restoration and mold removal, as well as fire damage restoration. Matching the next step to the damage helps keep the response focused on restoring your property.
With a clear plan, water damage recovery for homeowners can move from urgent response toward a more secure living space. Contact Droplet Restoration to discuss your property’s restoration needs.
Contact Droplet Restoration today and take a practical next step toward recovery.
Frequently Asked Questions
What should homeowners do immediately after discovering water damage?
Keep people away from electrical hazards and unsafe ceilings. If it’s safe, stop the water source, move dry belongings, photograph affected areas, and report the damage to your insurer.
How can homeowners identify the source and category of water damage?
Trace water to its likely entry point, such as a leaking appliance or roof. The category depends on the water source and contamination, so don’t judge safety by appearance alone.
When should homeowners hire a water damage restoration company?
Seek professional help if water affects several rooms, building materials, or areas you can’t safely assess. Droplet Restoration serves Vancouver, Battle Ground, Camas, Ridgefield, La Center, Longview, Kelso, Woodland, Castle Rock, and Kalama.
How does professional water damage recovery work, step by step?
Professionals assess the affected area, plan extraction and drying, then determine what can be cleaned or needs replacement. They document the work and restore affected areas after addressing moisture and damage.
Does homeowners insurance cover water damage, and what exclusions apply?
Policies may help cover sudden and accidental water damage, but coverage depends on the policy terms and cause. Review the applicable limits and exclusions for the specific event.
How should homeowners document water damage and file an insurance claim?
Take dated photos, note when you found the damage, and organize receipts and records by room. Report the event to your insurer and keep notes of claim communications.
What are the health risks of mold after water damage, and how can homeowners prevent it?
Mold can affect indoor conditions, so address damp materials and the source of moisture. Avoid disturbing visible growth, and arrange an assessment if it’s extensive or appears inside building materials.
How can homeowners compare water damage restoration companies and verify credentials?
Compare written assessments and proposed work, including extraction, drying, and cleaning. Ask who will perform the work, and review relevant credentials and documentation before proceeding.
